Augers
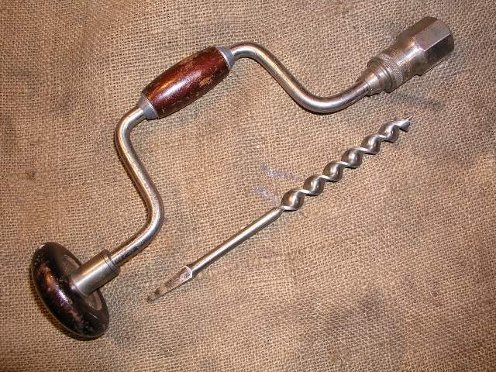
Why should anyone still want to use a hand powered auger bit? I still regularly use auger bits that fit in a hand brace i.e. bits with a square section tapering shank. If maintained properly they are a pleasure to use, and in many places where power is not available they are indispensible. Even a good battery drill only has so much grunt when making big and deep holes. A brace is quiet, and it allows good accuracy for hole positioning, with a bit of practice. Brace and bits are potentially lighter to carry than a good battery drill. A ratchet brace allows you to work in tight corners.
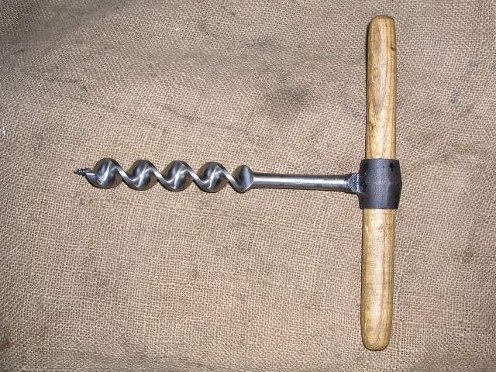
I also appreciate 'T' or 'bar' or 'eye' augers that you power hand over hand. Just the job for rather large diameter holes in hard timber - some were made up to 2". Longer augers are great for making holes for gate hinges in 8" posts. If keeping a hole straight and level is what you want, this tool does the job, provided you look carefully at what is happening. Using a square and a torpedo level against the shaft helps. I'm not against power drills and hex shank bits, flat bits, Forstner bits etc., but I think hand augers are under appreciated, and I mourn the decline (death?) of traditional auger bit manufacturing. Old bits deserve to be cared for, and unabused ones are a diminishing resource.
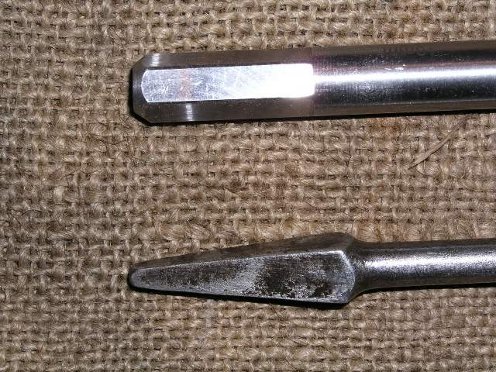
The picture above shows the old square taper type and the modern hexagonal type for a power drill. The hex type is very unsatisfactory in a hand brace. It doesn't really fit, and can damage the chuck.
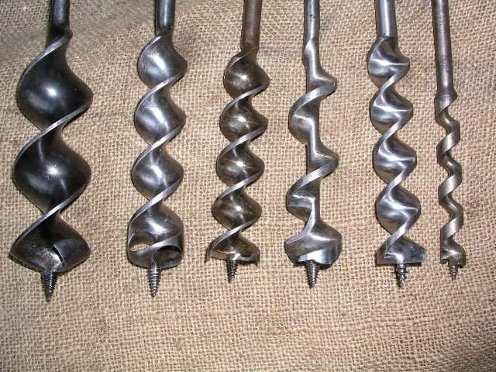
There are six basic types of older auger bit that you are likely to encounter (see bottom of page for some archaic patterns). These bits are (from L to R):
Gedge pattern.
Good for use in end grain, and at an angle to a surface because there are no spurs to catch and throw it off line.
Solid Nose or Bull Nose.
Uses as above but more robust. Versatile, can be used to enlarge an existing hole. Easy to sharpen with a round file.
Russell Jennings pattern.
Flat cutting edges coupled with edge spurs make clean accurate holes. Spurs are vulnerable to damage if used roughly.
Solid Centre or Irwin pattern.
A strong solid stem with only one spiral. May have Jennings, Scotch or Bull Nose cutters, and then has their strengths and weaknesses.
Scotch pattern.
The upwards facing side wings make this bit suitable for use in hard woods, and rough work. Not the cleanest auger to start - can tear out the grain. Needs careful sharpening to keep crisp corners where the wings turn up. Often found on 'T', 'bar', barrel or 'eye' augers that have a straight wooden handle, which are sometimes refered to as Scotch Eye augers. Note that the eye itself has no particular Scottish connection, it is the cutter that is Scotch type.
L'Hommedieu pattern.
Not seen that often, but the open spiral is supposed to be disinclined to get stuck in the hole. Because of this property it is favoured by wooden boat builders for the very long holes needed to bolt centre line timbers.
How should you sharpen these bits? First you need to understand how the cutters on the different designs engage with the wood. For example on a Jennings bit the spurs are pulled against the wood by the lead screw, making contact before the flat cutters. The spurs cut a circle, severing the grain in a ring. The flat cutters can then chisel out chips that the spiral can clear from the hole. The Gedge type acts more like a pair of gouges. With this in mind you can contemplate gaining experience on a bit that you don't care about too much.
You can use a slim slipstone on a bit that is just a little dull at the edge; flat, triangluar and round/tapered stones are available to suit different bit types. In careful regular use very little sharpening should be necessary. However if bits are damaged (by hitting fixings, or by being dropped, perhaps) you will need to file bits to sharpen them. Fine needle files (Jeweler's files) are suitable, I find the flat/triangular files best for flat cutters/spurs, with the round/oval/half round rat tail type suited to curved cutters. Diamond coated files can be good for removing bad damage, or correcting thick bevels. Special files were once made for bit sharpening, but I don't think they are to be had easily now.
A very important point to remember is that you must not remove any metal from the outside of the bit. This reduces the diameter, and prevents the cutters engaging with the wood. The tool won't cut properly, and may jam in a hole. File the inside of the spurs or wings, maintaining the same angle that the bit was made with. File the tops of flat cutters, once again maintaining the same angle that the bit was manufactured with. You will probably not be able to fully rejuvenate the tool if it is really badly worn or abused, particularly if spurs are very chipped. The spurs will disappear before you file out the damage! Damaged bits like this are good for improving your technique prior to working on better items. Gedge or Bull Nose bits of large diameter may sometimes be filed with a round chain saw file. Any burrs can be removed with fine abrasive paper like 'wet and dry'. The lead screw of any bit needs to be intact to draw the tool into the wood, but worn threads may be improved by chasing the spiral with a jeweler's file. If all has gone well the bit will cut cleanly and without excess effort. Practice is the only route to competence. Good luck!
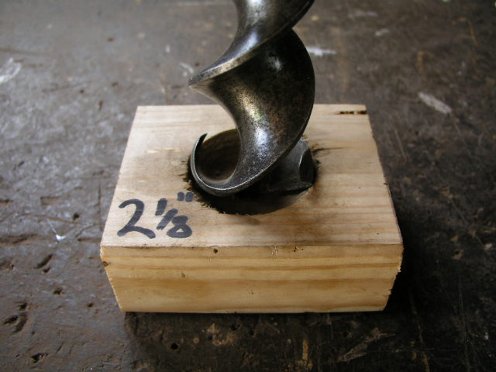
Lightly oil auger bits, and keep in a bit roll, or keep them screwed into a wood block for storage - your sharpening work is easily undone by careless handling.
The archaic (typically 19th C) bit types: shown below are from L to R - a Spoon bit, a Shell Bit, a Nose Bit and a Centre Bit. The first three bits generally come in sizes up to approximately 1/2". Their main drawbacks are that for accurate positioning they need a starting depression made with a gouge. The Centre Bit is more precise to position, but along with the first three bits shavings are not drawn out of the hole. All four types lack a pilot screw, and so require the user to apply contant pressure. Spiral bits seem to have superceeded these older patterns quite thoroughly.
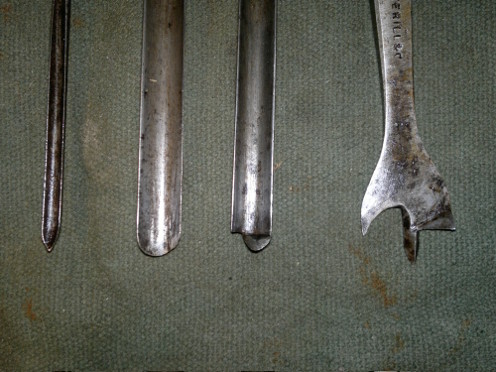
...and viewed from the back:
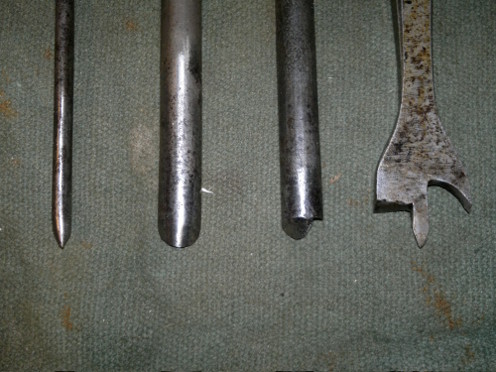
All of the older style bits were within the competence of a blacksmith to forge - much simpler than forging a good spiral auger bit. Another advantage of the first three is that they can drill a hole to a depth close to the far side surface, without a pilot screw or point breaking through; this is a characteristic appreciated by chair makers. All are strightforward to sharpen. The Spoon and Shell Bits are sharpened on the outside, while the Nose Bit is sharpened on the inwardly turned blade of the nose. The Centre Bit is sharpened on the horizontal blade, and the inside of the downward facing nicker. There are other minor variations on these designs, some specific to a given trade.